
Here you find some information on using the Perl script studercomm.pl and configuration file studercomm.conf. To communicate with the tape recorder you need a list with available commands for your recorder. For a 2 channel recorder you find such a list here, the list for the multichannel models A820 and A827 is here.
Software installation.
To use the script you need a Perl interpreter version 5.10 or later. From a DOS-prompt
you can check if Perl is already installed with perl -v. If it isn't installed,
you can download Perl from the Perl website.
Similar for Linux/UNIX user, start a terminal and enter perl -v. If it is
not there, see your distribution set or go to the Perl website.
Addtionally you need 2 Perl modules (for Windows: 1). For Linux/UNIX you need the Perl modules
Term::ReadKey en Device::SerialPort. See your distribution set or else
download the modules from CPAN. For Windows you need
one addtional module, Win32::SerialPort (that goes for 32-bits and 64-bits Windows).
You can download it at CPAN too. Installation from CPAN requires administrator or
root rights and some knowledge of make and install procedures. More on that
here and
here.
When using 64-bits Perl versions you may run into a message "Second write attempted before first is done"
immediately after starting the script. See "Error messages and possible causes" further down this document.
The Perl script.
Mei 2018: Versie 2 is ready. Various problems with flow control (xon/xoff) and local echo fixed. Thanks to Jacob Korn for his contributions. Jacob connects analogue synthesizers to computers via MIDI. Recommended for musicians.
Oktober 2024: Version 2.2. Various issues addressed. There is now 1 single version for all operating systems. Perl versie 5.36 (64 bits) made things easier, there are 2 files needed:
- View studercomm.pl (the script) or download the script here.
- View studercomm.conf (config file) or download the file here.
After downloading the two files should reside in the same directory. You can start the script
from the command prompt with perl studercomm.pl. Unix and Linux users have to check
the path in line 1 of the script and correct it if needed. Don't forget the execute bit.
Configuration file studercomm.conf.
When Perl and the modules are there you have to enter the serial port you are using
to connect to the tape recorder. Open file studercomm.conf with a suitable editor.
Lines beginning with '#' are comments, these lines will be ignored. There should
be one line beginning with 'Commport=' with the correct serial port. For Windows
this could be Commport=COM3.
Once you entered the serial port you can save the file and start communications.
The other options in this configuration file will suit most users.
Options Baudrate, Data bits, Stopbit and Parity are RS-232 protocol settings. The values here, 9600,8,1,none, conform to the standard used by most tape recorderes. If you changed these settings in your tape recorder you need to change this line accordingly.
Option CapsOn is used in terminal mode. This converts all lowercase characters to uppercase before sending them to the tape recorder.
With option ReadDelay the speed of data transfer can be changed. Applying a lower delay value (in milliseconds) here will speed up data transfer between computer and tape deck. Too low a value can lead to errors. Value 100 (milliseconds) is the standard. This turned out to be reliable at baudrate 9600.
Monitordelay is like 'Readdelay', but only works during the monitor function. This has to do with the amount of data the tape deck sends. Value 160 (milliseconds) is standard here.
With option Pidfile a different file name for .pid file (process id) can be specified (only for Linux, BSD and OS/X).
Option DebugFile specifies a file name for a debug file. If you remove the '#' sign in front of it, each run of the script will produce a text file named 'studercomm.dbg' containing all data transfers during that run. Useful in case of errors.
Start the Perl script.
The recommended way to run is from the command prompt. Only then you will get to see all the messages from the script. Once you know which commands you need, you can integrate them with a shortcut.
From Windows: Select Start, Run and enter cmd.exe .
Then change to to the folder where studercomm.pl and studercomm.conf reside.
Start the Perl script: perl studercomm.pl
For Linux, FreeBSD and OSX: Open a terminal and navigate to the directory.
containing studercomm. Run the script with perl studercomm.pl
You can make studercomm.pl executable. You will have to set the execute bit with
chmod +x studercomm.pl for that to work. Additionally, you
have to make sure that the first line in the script points to your Perl
interpreter. You can find the path to Perl with whereis perl
After that you can start the script like this: studercomm.pl
At program start the script tries to establish a connection using the specified serial port. If successful, the script will ask the tape recorder for its type and for a serial number or software date. After that the processing begins. Machine type and serial number (A810) or software date are used in the names of all output files. The serial number consists of 6 digits, the software date consists of a week number and a year like this: 001689 for week 16 in 1989. Output file names look like this:
tttt-nnnnnn-logicalname-yyyymmdduumm.txtHere,
tttt denotes the machine type (e.g. A807), nnnnnn.
represents the serial number or software date.
Command line options.
Running the script without command line options like perl studercomm.pl
will produce two output files. The first named report is a human-readable
text file containing all audio settings. You can find an
example here.
The second file is named restore. This text file contains all the commands
needed to write the audio settings back to the tape recorder. You can find an
example here.
During the process you may notice that the script changes the speed and
equalization setting on the tape deck in order to read the actual settings.
You can restore the file with audio settings with command line option -b (see below).
Some models and software versions do not provide means for the script to change
tape sort, speed and/or equalization in order to read the settings.
them. On these machines, notably C27n and A810, only the settings for the
currently selected tape sort, speed and equalization will be read. In order to
get a list of parameters for the other tape sort, speeds and equalization, change
the setting on the tape deck first. Then restart studercomm to read the settings again.
Without command line arguments, the script does not write parameters to the recorder.
Option -a.
Using perl studercomm.pl -a the audio settings associated with the
currently active settings (tape sort, tape speed and CCIR/NAB) will be written to a
file named current-set . Each line contains a command (SAP) to write a setting
back to the tape recorder. It is in fact a backup file for the currently active setting
state, you can restore it using the -b option.
Here is an example of such a file.
Using option -a the script will not write audio parameters to the recorder.
Option -b <input file>
With option -b the specified input file will be read and transmitted to the
tape recorder line by line. Empty lines and lines beginning with '#' will
be ignored. Each line must contain one single command. With
this option, the files current-set and restore can be send
to the tape recorder for a partial or complete restore of audio settings.
If the file name contains spaces the name must be put between quotes.
Please note: If you use this option for a partial restore (which is always the case with
current-set and sometimes with restore) you will have to
switch your tape deck to the settings that were selected at the time the file
was made. Otherwise, you might overwrite the audio settings for speed 15ips
with the settings for 7.5ips.
Using this option carefully, audio settings will be overwritten.
Option -c <recorder-command> [ <input file | >output file ]
Option -c allows you to send a single command to the tape recorder.
For commands requiring files the file name can be specified, for both input and output.
A few examples.
  perl studercomm.pl -c PLY
  perl studercomm.pl -c FWD
  perl studercomm.pl -c STP
  perl studercomm.pl -c TM?
The first line sends command PLY to the tape recorder. It has the effect of pressing the PLAY-button. You might like to try the STP command after this. The fourth example asks for the timer reading, which will then appear on screen. You can capture the answer from the tape deck in a file like this:
perl studercomm.pl -c "D 108 26E >ram-108-26e.txt"Command D 108 26E asks for the contents of RAM from address 108 hex with. length 26e hex. The result will be a memory map, it will be written to file ram-108-26e.txt. This command contains spaces, hence the quotes. Command 'D ...' does not work on all models/software versions. A similar command is 'P'. Command P writes output in Motorola exorciser record format, also known as .s19 or .srec.:
perl studercomm.pl -c "P 108 227 >ram-108-227.txt"In this example the output is send to file ram-108-227.txt. Two more examples with files:
  perl studercomm.pl -c "SPA >backup-td-au.bin"
  perl studercomm.pl -c "LPA <backup-td-au.bin"
Command SPA (save parameters, for A812, A816 and A820 only) saves all settings from the tape recorder. This is the recommended command to save all settings. In this example, the data will be written to file 'backup-td-au.bin' This produces a complete backup file. Using command LPA (load parameters) with the same file as input can give you a full restore. Other models and software versions may respond to similar commands 'S' and 'L', see your manual. Using option -c you can write almost anything to the tape recorder. Use it with care.
Option -h
This will simply show all available options for studercomm.pl.
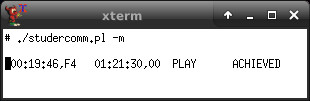
Option -m
Monitor your tape deck. With this option studercomm uses command 'DST' to show
a running view on the status of your tape deck. See the screencapture on the
right. Linux, OSX and BSD will
allow you to send PLAY, STOP, FWD, RWD, LOC and REC commands with a single
keypress from within this view. With Windows, only the running status is shown,
since Windows doesn't provide a mechanism to intercept a keypress while continuously
reading the serial port.
You may have to experiment with the value for 'Monitordelay' in studercomm.conf for this function to run smoothly. It depends on the speed of your computer. Value 160 (milliseconds) should run with older hardware. A lower value runs faster and will react faster to keystrokes. Too low a value will lead to incomplete output or no output at all.
Option -t
This option starts the terminal mode. You can enter commands here and instantly see
the answer from the tape deck. It allows you to control the tape deck using commands
like PLY, RWD, FWD, REC and STP (play, rewind, fast forward, record and stop).
The software settings for the currently active settings (tape sort, tape speed and
equalization) can be listed and changed here with commands LIST and SAP. An example:
  >list
  AP? 1,0 : 80     # Channel 1 & 2, 0=repro/sync level, hex value.
  AP? 2,0 : 80     # Channel 1 & 2, 0=repro/sync level, hex value.
  AP? 1,1 : 50     # Channel 1 & 2, 1=repro/sync treble, hex value.
  AP? 2,1 : 50     # Channel 1 & 2, 1=repro/sync treble, hex value.
  AP? 1,2 : 80     # Channel 1 & 2, 2=repro/sync bass, hex value.
  AP? 2,2 : 80     # Channel 1 & 2, 2=repro/sync bass, hex value.
  AP? 1,3 : 82     # Channel 1 & 2, 3=repro/sync equalization, hex value.
      :
  >sap 1,1,53
  SAP 1,1,53...>
  >list
  AP? 1,0 : 80     # Channel 1 & 2, 0=repro/sync level, hex value.
  AP? 2,0 : 80     # Channel 1 & 2, 0=repro/sync level, hex value.
  AP? 1,1 : 53     # Channel 1 & 2, 1=repro/sync treble, hex value.
  AP? 2,1 : 53     # Channel 1 & 2, 1=repro/sync treble, hex value.
  AP? 1,2 : 80     # Channel 1 & 2, 2=repro/sync bass, hex value.
  AP? 2,2 : 80     # Channel 1 & 2, 2=repro/sync bass, hex value.
  AP? 1,3 : 82     # Channel 1 & 2, 3=repro/sync equalization, hex value.
      :
Additionally there are commands DEC and HEX to calculate hex values:
  >hex 8c
  HEX 8C equals decimal number 140
  >dec 84
  DEC 84 equals hexadecimal number 54
You can exit the terminal with quit, exit or bye.
An everyday example.
Let's assume we need to use an A810 to make a recording that will be played on a 4-track Revox B77. The record level of a 2-track A810 is usually far too high for a 4-track B77. So we will have to lower the record level of the A810 around 40%. First we put the A810 in the right mode, say 7.5ips and NAB. Then we read the actual audio parameters like this:
perl studercomm.pl -aFile A810-123456-current-set-201912081130.txt will be made. In that file we find this:
  # Channel 1 & 2, 4=record level, hex value.
  SAP 1,4,8C
  SAP 2,4,8C
The recording level at 7.5ips and NAB for both channels is set at hexadecimal value 8C. We have to lower that by 40%. Yes you can! To do that we start the terminal mode:
  perl studercomm.pl -t

  Studercomm: Initializing port /dev/cuau3 to 9600,8,1,none... Okay
  Revox A810 found

  Studercomm, terminal mode: Type QUIT, EXIT or BYE to terminate.

  >hex 8c
  HEX 8C equals decimal number 140
  >dec 84
  DEC 84 equals hexadecimal number 54
  >SAP 1,4,54
  >SAP 2,4,54
  >
Command 'hex 8c' calculates hex value 8c to decimal value 140. Lower this 40 percent, that makes 84. Command 'dec 84' calculates decimal value 84 to the hexadecimal equivalent 54. So we then write that value for both channels to the tape deck with the SAP-commands. We're ready to start recording now.
Once the recording has finished the record level of the A810 A810 should be reset to its original state. We can use the file we made earlier.
perl studercomm.pl -b A810-123456-current-set-201912081130.txt
Error messages and possible causes.
- No answer, no answering serial device found, can't get COMMPROP block
- Wrong comm-port specified in config file
- Cable not connected
- Wrong cable wiring
- Tape recorder switched off
- Cannot open port ...
- Non-existing comm-port specified
- Specified comm-port is already in use by another process
- Linux/UNIX: Does the user have read/write rights to the device
- Unknown serial object (machine type not recognized)
- Wrong machine connected (is it your modem?)
- Wrong baudrate/databits/stopbit/parity specified
- Too old Perl version. Please use v5.36 or higher
- Cannot read/write file ...
- Input file does not exist
- Linux/Unix: Read/write rights okay?
- Second read/write attempted before first is done .... (Windows only)
- Some 64-bit Perl versions come with a SerialPort.pm module that doesn't work on 64-bit Windows installations. This problem has been with us for quite some time, but should be solved by now (october 2024). The underlying file CommPort.pm caused most of these problems. Please check with your Perl supplier whether your version of SerialPort is up-to-date. If that doesn't solve it you might want to try this version of CommPort.pm in place of the old one and try again. Thanks to Daniel Nestler for his help in solving this.