
Start a session with PuTTY.
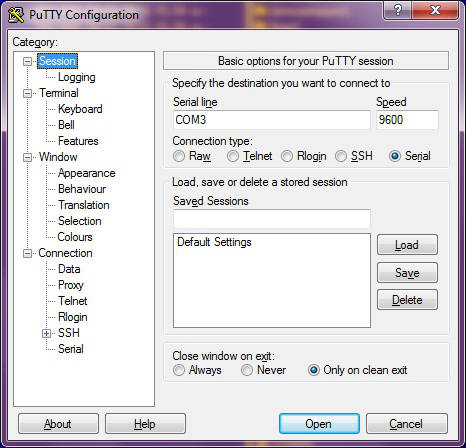
When your computer is connected to your tape recorder you can begin communicating using PuTTY. Putty starts up with a 'Session' window as shown in the first picture on the right. First you have to enter the name of the serial port you are using. Choose 'Serial' here, then enter the name of the serial under 'Serial line'. For Windows it will be COM1, COM2 or COM3, in case of Linux something similar to /dev/ttyS0. Speed '9600' is a standard used by both PuTTY and Studer, it is a good value to start with. Then click button 'Open' to start a communication session. An empty terminal window will appear. Here you can type PLY (in capitals) and press Enter. Your tape recorder will start playing. With command STP you can stop it.
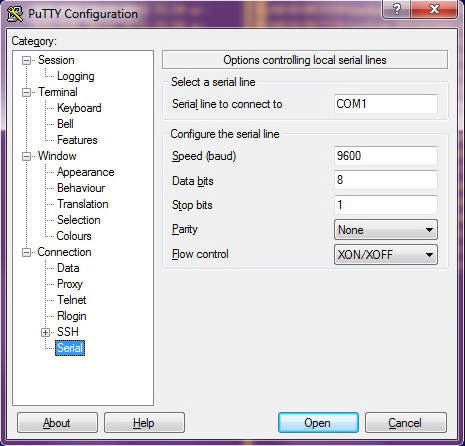
If you get an error message instead of a terminal window you will have to check things. Is the tape recorder switched on? The serial cable is plugged in and okay? The name of the serial port you just entered is correct? Connection settings at both ends of the cable are the same? You find PuTTY's settings by choosing 'Connection, Serial' in the left part of PuTTY's main window, as shown in the second picture on the right. The settings here (9600,8,1,none and XON/XOFF) are a widely used standard used by both PuTTY and Studer. If you changed these settings on your tape recorder you must change them here accordingly. For Linux/UNIX-users: Check the rights. The user may not have access to hardware devices.
Once you can start a session you may take a look at the other options PuTTY has to offer. In the left part of Putty's main window you can change font, colours and screen size the way you like. When finished, you can save your settings by clicking 'Sessions' in the left part of the window. Make sure 'Serial' and your serial port name here are still correct, then enter a session name under 'Saved sessions'. Say you session name is A807. Then click the save button. The name A807 will appear in the list. Next time you start PuTTY you can restore your settings by clicking the session name and pressing 'Load'.
Controlling the tape recorder with PuTTY.
Communicating with the tape recorder is simple. You type a command (always in capitals) and
press Enter. The tape recorder will then answer. That answer may be an action, like when you send
a PLY command (=play). The answer may also take the form of some text that will appear in
the terminal window, in case the command was in fact a question.
Now that commands PLY and STP are mentioned, tape recorder owners can probably imagine what
commands RWD, FWD, REC and LOC do. But there are more commands. Available commands differ per
model and software of that particular model. You find a global list of available commands
for 2-channel recorders (both Revox en Studer) here,
you find the list for multichannel A820 and A827 here.
The commands allow you to control the tape deck with your computer. But there is more. You can ask for various data from your recorder. Command MT? will give the machine type, the answer will be a 2-digit code (Studer) or the model (Revox). Command SD? will return the software date of your recorder, something similar to '004690' (week 46 in 1990). A special command is DST, display status (Studer only). The recorder will continuously send its status to your PuTTY window. It looks similar to this:
00:01:23,E4 00:00:44,00 PLAY ACHIEVEDYou can terminate command DST by pressing Ctrl-x. This key combination sends a reset signal to the recorder and works with all models.
Save audio settings with PuTTY.
Depending on model and software version there are a number of commands available
to access the audio settings in the recorders' memory. Command AP? works for all
Studer machines. An example: AP? 1,4
Command AP? (Audio Parameter?) needs two additional digits separated by comma.
The 1 denotes channel 1 (left), the 4 denotes 'level record' (see the list).
Command AP? 1,4 asks for the setting 'level record' for the left channel
at the currently selected tape sort, tape speed and equalization.
The recorder will answer with a hexadecimal value between 00 to FF. The recorder
uses 1 single byte to store a setting, hence possible values are from 0 to 255 decimal
and from 00 to FF hexadecimal.
In your PuTTY window, the value returned by the recorder may overwrite the command
you just typed. That's because not all recorders send a newline sign. We can
do something about it later on.
Command AP? will return only one single setting that is used for the currently chosen tape sort, tape speed an equalization, see the list. If we want all settings for the current tape sort, tape speed an equalization we need the following set of commands.
AP? 1,1
AP? 2,1
AP? 1,2
AP? 2,2
AP? 1,3
AP? 2,3
AP? 1,4
AP? 2,4
AP? 1,5
AP? 2,5
AP? 1,6
AP? 2,6
AP? 1,7
AP? 2,7
AP? 1,8
AP? 2,8
AP? 1,9
AP? 2,9
It would be nice if we could simply cut and paste these lines to PuTTY, but at baudspeed 9600 that may be too much for the recorder to handle. However, 4 lines at a time should work. Before doing so, you might have to change settings in order to use Ctrl-v of Shift-Ins to paste the lines to PuTTY. Click 'Window, Selection' in the left part of PuTTY's main window and select CLIPBOARD for either Ctrl-v or Shift-Ins or both. To solve the problem with overwriting you can activate PuTTY's log option. Click 'Session, Logging' and choose 'All session output' and 'Always overwrite it'. Make sure you save your settings for the next time. Click 'Session', then click your session name and press the 'Save' button.
Now start a session and paste the lines above to PuTTY, 4 lines at a time. Press Enter after each paste to make sure that the fourth line will be processed. Then open PuTTY's log file with Notepad or any other suitable editor. It will look like this:
>AP? 1,1
39
>AP? 2,1
39
>AP? 1,2
80
>AP? 2,2
80
   :
>AP? 2,7
B1
>AP? 1,8
?
>AP? 2,8
?
In PuTTY's log file commands and answers will be on separate lines. Please note, that commands for settings 8 and 9 will result in a question mark. Settings 8 and 9 will only work with a A820 MkII, hence the question mark as an error sign. PuTTY's log file now contains all audio settings for the currently set tape sort, tape speed and equalization. That's nice for a start.
In case of loss of all audio settings it would be better to have a file that contains all
commands necessary to restore the settings. To restore an audio setting from computer to
recorder we can use command SAP. An example: SAP 2,7,B1
SAP means Save Audio Parameter. It takes the channel as its first parameter (here it is 2, right),
the second parameter (7) denotes the setting (equalization record,
see the list). The third parameter is the value B1
that we got earlier from the recorder. With an editor, the contents of PuTTY's log file and
some furious typing I was able to produce this text file:
# 2019-12-07: Audio parameters voor bandsoort A, 19 cm/sec. en NAB.
SAP 1,1,39
SAP 2,1,39
SAP 1,2,80
SAP 2,2,80
SAP 1,3,6D
SAP 2,3,6D
SAP 1,4,30
SAP 2,4,30
SAP 1,5,9A
SAP 2,5,9A
SAP 1,6,2A
SAP 2,6,2A
SAP 1,7,B1
SAP 2,7,B1
This text file contains all the commands I need to restore all audio settings for tape sort A, tape speed 19cm/s and NAB equalization. I made files like these for all the tape sorts, speeds and equalizations that I use. If disaster strikes, at least the tape recorder will be working properly!
Alternatives to access audio settings.
Commands AP? and SAP access one single audio setting at a timen. The microprocessor controlling your tape recorder is a Motorola A6800 series, it will store the audio settings in its random access memory (RAM). Some Motorola commands still work with the tape recorders. These commands allow access to larger parts of RAM. These are the commands.
Command  Input             Output           Meaning

D        D start end CR    Hex dump        Display RAM content as hex dump
P        P start end CR    Exorcisor dump  Punch RAM inhoud in Exorcisor formaat
L        L data CR         CR LF           Load Exorcisor data into the recorder
S        S CR              data CR LF      Save Exorcisor data from the recorder
LPA      LPA data          CR LF           Load audio parameters
SPA      SPA CR            data CR LF      Save audio parameters to tape/computer
UAP      UAP addr val CR   CR LF           Update Audio Parm at address with val
More on these commands here. The commands won't work with all models and/or software versions. And even if command 'D' does indeed produce a hex dump, you will need to know at which address a particular setting can be found. The service manuals for your recorder wil list available commands and may also provide a formula with which you can find the RAM-addres of a particular setting. Unfortunately, the manuals are not always complete at this point. Some experimenting with PuTTY may bring a surprise.
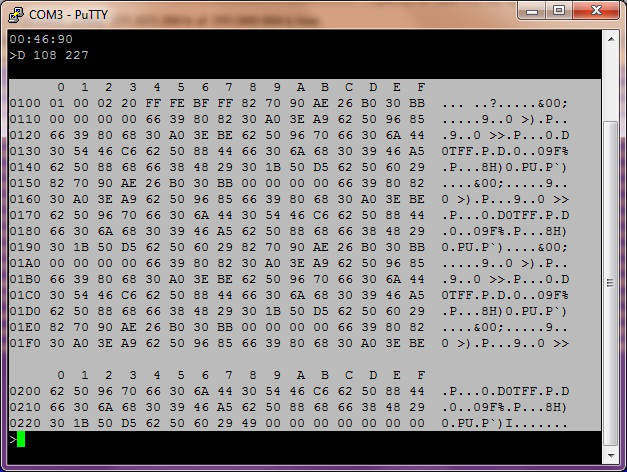
An example of command D. To display a hex dump of all audio settings in RAM enter this
in PuTTY's terminal window: D 108 26E
If it brings output as shown in the third screencapture on the right, we need the
addressing scheme to convert the data to human-readable text. I made a script to do
that conversion. Select and copy the data like in the screencapture on the right.
Then paste the data in the entry box below and click 'Send'. The script here
will try to convert it to readable text using this adressing formula:
RADR  = ARAM-12 + IDAC + ISYNC*8 + CCAB*12 + SPEED*24 + CHNL*72 + TAPE*144

RADR  = Relative address (decimal), an offset from absolute address 108 hex
ARAM  = Absolute address in RAM (hexadecimal 108, decimal 264)
IDAC  = 0 = level repro,  1 = treble repro,  2 = bass repro,  3 = equalization repro
        4 = level record, 5 = treble record, 6 = bias record, 7 = equalization record
        8 = erase current level, 9 = skimming bias level (8 and 9 for A820 only)
ISYNC = 0 = repro mode, 1 = sync mode
CCAB  = Equalization, 0 = CCIR, 1 = NAB (3.75 ips always NAB, 30 ips always CCIR)
SPEED = Tape speed, 0 = 3.75 ips, 1 = 7.5 ips, 2 = 15 ips, 3 = 30 ips
CHNL  = Channel, 0 = channel 1, 1 = channel 2
TAPE  = Tape sort, 0 = tape sort A, 1 = tape sort B (A810: 1 = A, 0 = B)
The script hasn't been tested with all models and software versions, due to the
disturbing fact that no one gives me all models to test it... So you might want to
check its output.
If you have information on available commands and/or adressing schemes not mentioned
in the service manuals and not mentioned here, please let me know. More people
will be interested to know about it. Thanks in advance.